Welcome to XboxIssues

Welcome. I decided to make this blog after being a Xbox Ambassador for a number of years.

If you don't know an Ambassador is a Volunteer that Microsoft uses to help ease the load on the actual hard working support people.

I noticed that alot of the questions I would get could easily be solved by using Microsofts Xbox.com site.

Since some of the help articles may be hard to find, understand or the issue may be called something different in the gaming community making it more difficult to solve, I've decided to make this blog to make it easier for fellow gamers to get xbox assistance, news and all things Xbox.

If you have any Xbox related question you can find the answer to feel free to contact me on YouTube, twitter or in the comments.
Showing posts with label Help. Show all posts

Thursday, July 13, 2017

How To: Hard Reset or Power Cycle Xbox One (updated for Newest Xbox One System Update)

The first step to fix any Xbox One issue is to correctly "Hard Reset" your console. The technical term used by Xbox Support is  "Power Cycle your Xbox One." Think of this like Clearing the Cache on the 360

I know you're thinking "yeah buddy I did turn it off and back on, I'm not an idiot & can turn a console off and on."  Well I bet you didn't do it correctly.

To correctly  "Hard Reset" or Power Cycle your Xbox One" follow these steps:


How To Hard Reset or Power Cycle Xbox One  (New Way)

  1. Scroll left on the Home screen to open the guide. 

  2. Select Settings. 
  3. Select Restart console. 
  4. Select Yes to confirm. 

Note If you're unable to access the guide or if the console appears to be frozen, press and hold the Xbox button  on the console for about 10 seconds until the console turns off. After the console shuts down, touch the Xbox button  on the console again to restart.


How To Manually Hard Reset ot Power Cycle Xbox One (The Old Way)
  1. Turn off your console by holding the Xbox button on the front of the console for approximately 10 seconds. The console will power down.
  2. Turn your console back on by pressing the Xbox button on the console or the Xbox button on your controller. 
  • Note If you don't see the green boot-up animation when the console restarts, repeat these steps. Make sure that you hold the power button until the console completely shuts down. 

Again if you do not see the above screen on boot you did not do it correctly.

  • Important If your console is in Instant-On power mode, the above steps will shut the console completely off. Instant-On mode, or the ability to turn on your console by saying "Xbox on," won't be enabled until you restart the console.
This is not a "Factory Reset" you will NOT lose any data.  This simply clears the cache or temporary storage on the Xbox One


Monday, August 3, 2015

HELP: Install Xbox 360 Wireless Receiver on Windows 10 (With Xbox One Support in Game Streaming)

So you took the jump and updated your computer to Windows 10. But it looks like your Xbox 360 wireless receive is not installed, and you can't use your Xbox 360 wireless controller on your PC anymore.

Good news, here is the fix and a bonus, you can use your 360 controller to play Xbox One games when game streaming, as long as you use the newest driver, and here is how


1. Load My Computer or the file manager
2. Right click "The Computer" (may be named different on your system)
3. Click properties
4. Click device manager
5. Find the "Unknown Device", right click
6. Click "update driver software"
7. Click browse my computer
8. Click let me pick
9. Scroll down to xbox 360 peripherals
10. Find Xbox 360 Wireless Receiver for Window there should be 2 different drivers, the newer one will allow you to use the 360 controller for Xbox One when streaming games to your pc
11. Igore the pop up warning 
12. Done


Sunday, July 26, 2015

HELP: Error 87DE2714 occurs when trying to start a game or app

Error 87DE2714 occurs when you try to start a game or app


Problem

You see the following error when you try to start a game or app:
Error 87DE2714
This may mean that the Xbox One console was unable to verify the licence for the game or app. This occurs when you're not signed in to Xbox Live.

Solutions

Solution 1: Check the Xbox Live service status
Check for service alerts at Xbox Live status, or see if there's an alert at the top of this page. If there are any current service alerts, wait a while and then try again.
US customers only: If a specific service or app is experiencing an outage, you can request SMS or voice notification when the outage is resolved. Under the app or service name, click Notify me when this service or app is up and running.
Solution 2: Sign in to Xbox Live using the account that purchased the game
Check that you're signed in to the Xbox Live account that purchased the game or app on the Xbox One console. Additionally, check that you're connected to Xbox Live.
You can test your connection by following these steps:
  1. Go to the Home screen.
  2. Press the Menu button on the controller.
picture
  1. Select Settings.
    Note You can say “Xbox, go to settings” from any screen, but you'll need a controller once you're on the Settings screen.
  2. Select Network.
  3. Select Test network connection.
If the test confirms that you're connected, try launching the title again.
Solution 3: Set your Xbox One console as your home Xbox
If the Xbox Live service is down, the service may not be able to verify your licence for a digitally purchased game or app. You can fix this issue by setting your Xbox One console as your Home Xbox.
Note You can designate only one console as your home Xbox.
  1. Say "Xbox, go to settings", or choose Settings from My games & apps.
  2. Select My Xbox from the left-hand side of the screen.
  3. Select My home Xbox.
  4. Review the information, and then do one of the following:
    1. Select Make this my home Xbox to designate the console as your home Xbox.
    2. Select This is not my home Xbox to remove the designation.
You can also try a Dashboard Refresh: Hold LT+RT+Y until dashboard reloads. 

Friday, April 17, 2015

YSK: Fix "This disc is unreadable" when you use a Games on Demand game

So you just downloaded the latest free Games With Gold for the Xbox 360 or purchase a great no game from Games On Demand.

It has downloaded and installed and you want to play, but when you click on the game you get  "This disc is unreadable".  WTF the games does not have a disc I downloaded it.

You should know how to fix "This disc is unreadable" error when you use a Games on Demand game


If you see the following error message when you try to play a Games on Demand game on your Xbox 360:

This problem can occur if your Xbox 360 console can’t read game files on the hard drive.

You may be able to resolve this problem by storing the game on a different part of your hard drive. 

 To do this, delete and download the game again. Here’s how:


  1. Select settings, and then select System. 
  2. Select Storage, and then select your storage device. For example, select the Xbox 360 Hard Drive. 
  3. Select Games and Apps, and then select the Games on Demand game that doesn’t play. Take note of the size. 
  4. Select the Games on Demand game, and then select Delete. 
  5. Go to the Games Store and download a game demo or other content that is approximately the same size as the Games on Demand title. 
  6. Press the Guide button on your controller.
  7. Select Settings, and then select Account. 
  8. Select Download History. 
  9. Select the Games on Demand game, and then select Download Again. 
  10. Once it’s downloaded, play the Games on Demand game.
If you keep experiencing the problem, contact Xbox Support.


Tuesday, March 24, 2015

HOW TO: Transfer Xbox 360 Borderlands characters to the Xbox One Handsome Collection

So you just bought Borderlands: The Handsome Collection, probably because you heard you can transfer your characters from the Xbox 360 Borderlands 2 and Borderlands: The Pre-sequel.

In order for this to work you MUST have Borderlands 2 and/or Borderlands: The Pre-sequel on the Xbox 360,  meaning you must still have your 360.

To use a save from the previous generation versions of Borderlands 2 and Borderlands: The Pre-Sequel in Borderlands: The Handsome Collection, first you’ll need to download the patches enabling cross-save for Borderlands 2 and Borderlands: The Pre-Sequel.  This is a patch on the 360.  You'll also have to download the Day one patch on the One.


Once you have that patch downloaded, follow these steps:

  • Ensure all versions of the games are up to date with the latest patch (old-gen and new-gen) and you are connected to PlayStation Network or Xbox Live.
  • From the main menu of the PS3 or Xbox 360 versions of BL2 or BL:TPS, choose the “Cross Save” (PlayStation consoles) or “Cloud Save” (Xbox consoles), then “Upload Save” function.
  • Once the save has been uploaded, choose “Cross Save” or “Cloud Save” then “Download Save” from the main menu of the PS4 / Xbox One Handsome Collection game for which you’re downloading the save.


IMPORTANT: Only one save may be uploaded at a time. If you have multiple saves to transfer, upload one save, then download it in the Handsome Collection, then repeat the process for successive saves.

Please note:

  • The Xbox family of systems can only move saves from Xbox 360 to Xbox One and not the other way around.
  • Uploading a save does not remove it from the original system, it only creates a copy of the save on the network.
  • Players will need the day 1 patch for the Handsome Collection in order to download saves.
  • Players will also need the most recent patch installed for PS3 / Xbox 360 in order to upload saves.

Monday, March 23, 2015

HELP: Where can I accept the Terms of Use?

This one comes up a lot.  "I received a pop up that said please accept the terms of use" or something similar. This has a real quick and easy solution.

You can accept the Terms of Use by signing at xbox.com/account.  Once signed in you should get a notification or pop up that allows you to see the TOS and accept.

If I don’t accept the new Terms of Use, what happens?
Accepting the Terms of Use is a requirement for accessing the Xbox Live service. Customers must agree to the newest version of the Terms of Use to continue using Xbox Live.

Wednesday, March 18, 2015

HOW TO: Add your MP3s to OneDrive so you can play them on your Xbox

So now it looks like we can upload mp3s to our OneDrive and stream them from there to our consoles.

Here is how:

1. Open your OneDrive Music folder from the web or via the OneDrive app.

2. Upload your favorite MP3s from your hard drive to the OneDrive Music folder.

3.  Sign into the Xbox Music application on your PC, Windows Phone, Xbox or the web with the same Microsoft Account you used in OneDrive. Your OneDrive music files will now be listed as songs in your collection, free to play wherever you go!

 Note: if you are still not seeing your files, please make sure you have accepted the Xbox Terms of Use here.


Frequently Asked Questions

HELP: Where do I send my Broken Xbox One for Repair/Exchange?


So your xbox is broken and you registered to get your console fixed or replaced. But where do you send it?  If you did not receive an address where you should send the broken One, here is a list of shipping addresses for the Xbox One's Product Returns Centers listed by country.


United States 
Microsoft c/o Exel
Product Returns Center
5400 George McVay Drive
McAllen, TX 78503

Canada 
Microsoft c/o Jabil - UPSSCS
4150 Mainway
Burlington, Ontario
L7L-0A7

Europe (including the UK and the Channel Islands) and UAE 
European Repair Centre
Teleplan Prague s.r.o.
a Dlouhém 88
251 01 Říčany-Jažlovice
Czech Republic

Colombia 
Complejo Logístico San Diego
Km 1.5 Vía Siberia Funza
Bodega 7C
Cundinamarca
Colombia

Mexico
Flextronics Manufacturing Mex SA de CV
Carretera a la Base Aerea No. 5850
Edificio 1 / FULFILLMENT
Residencial La Mora, CP 45136
Zapopan, Jalisco
Mexico

Brazil  
Tel-NT Brasil Comércio De Equipamentos De Telecomunição Ltda
162, Antonio Felamigo Street,
Macuco/Valhinhos/SP 13279-452
Brasil

Chile 
Jabil Global Services Chile, SpA / UPS Santiago
Carretera Gral. San Martin 9260
Santiago
Chile
Asia/Pacific Service Center addresses

China 
Jabil Circuits (Suzhou) Pte. Ltd.
Suzhou Industrial Park, Weiting Town
Block A4, 135 Putian Road, Putian Industrial Park
Post Code 215121

Australia 
UPS
Botany Grove Estate
14a Baker Street, Botany, Sydney
NSW 2019

New Zealand 
UPS
120 Pavilion Drive, Airport Oaks
Manukau, Auckland 2150

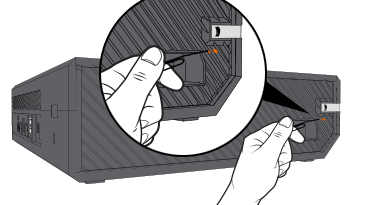
HOW TO: Manually eject a disc from your Xbox One console

So you need to send your Xbox One back for repairs or for some reason it will not power on, and you have a disc inside the needs to come out.

After looking at your console you may notice that there appears to be no manual eject button or hole anywhere on the One.  Don't fret there is a way to manually eject a disc from your Xbox One console.


1.  Disconnect the power cord and any other cables connected to the console.

2.  Uncoil a large paper clip.   Note A standard-sized paper clip is not long enough to eject the disc. You must use a large paper   clip because it must be inserted about 1.5 inches (nearly 4 centimeters) to successfully eject the disc.  

3.  Find the small orange rectangle behind the vents on the left side of the console.


4.  Insert the straight end of the paper clip into the eject hole, which is located next to the orange rectangle. You may have to angle it slightly forward (toward the front of the console) as you insert it.
5.  The disc should pop out slightly. Pull out the disc the rest of the way with your fingers.
Note Make sure the disc isn’t sticky and doesn’t have a label that might prevent it from ejecting again in the future.

Tuesday, March 17, 2015

HELP: I can’t hear my friends online, or I can’t join or host a multiplayer game with my Xbox One

Can your Xbox One connect to Xbox Live, but you can’t hear your friends online within a game or a party? Or are you unable to host or join a particular multiplayer game? If so, then you may be encountering a Network Address Translation (NAT) related issue.


To check your NAT Type:


1. Press the Menu button on the Xbox One controller.
2. Select Settings.
3. Select Network.


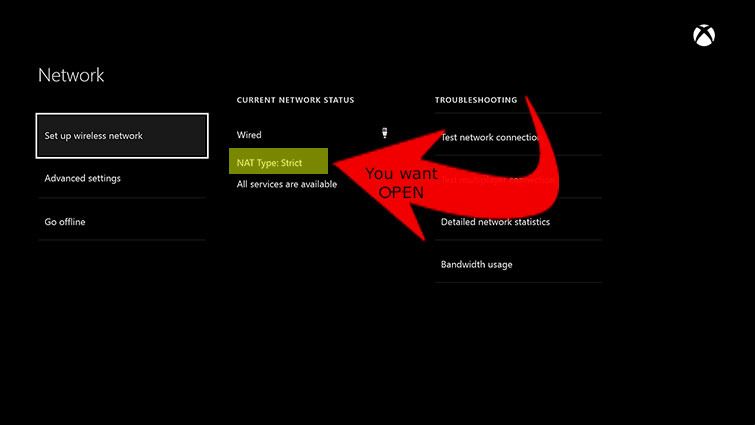
On the Network settings screen, under Current Network Status, the NAT Type field will tell you your current NAT type.


If NAT type says anything other than Open you need to change that, before diving in to your router settings to try and Open your NAT thee are a few tricks that may work:

1. Try Hard Resetting the console

2.  Just simply reset your router.  Most router have a little button or a hole to poke with a paper clip labeled "RESET" or similar. Push it. when the router is back up check the NAT again as above.

3. The One has the ability to send a NAT Refresh code to your router has device discovery or UPnP on (you'll have to google your router info to check if you have this on).  To send the code:


  1. Press the Menu button on the Xbox One controller. 
  2. Select Settings.
  3. Select Network.
  4. On the Network Settings screen, select Test multiplayer connection on the right side of the screen.
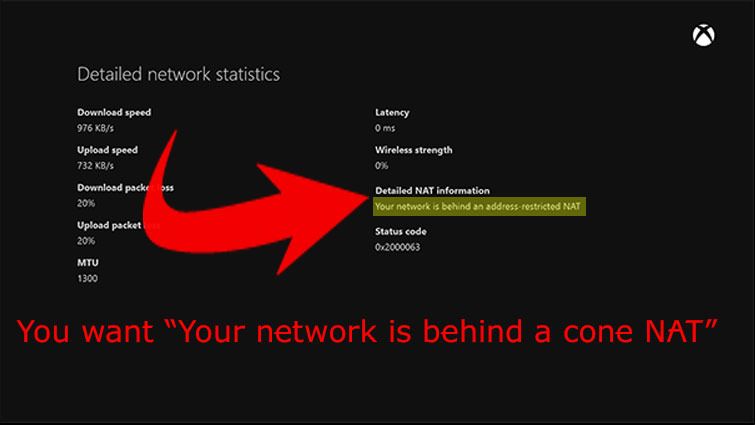
  5. Once the test completes do not go back to the home screen  simply Hold LT, RT, LB & RB all at once, and it will test NAT. A new screen will pop up:

If none of this works see: HOW TO: Open NAT XBOX One & 360

Monday, March 16, 2015

HOW TO: Clear The Cache on Xbox 360

Sometimes you have issues with your 360, for example corrupt downloads, messed up game saves etc.  One of the simplest troubleshooting tools is to Clear your cache.

The Xbox 360 system cache stores such items as game updates, system update installation packages, and gamer pictures of your friends. You can often resolve issues with your Xbox 360 by clearing the system cache.


The following are not removed when you clear the Xbox 360 cache:

  • Your gamertag 
  • Content that you have downloaded 
  • Game files 
  • Console software updates


Clearing the cache removes previously downloaded game updates. You must download these updates again the next time you play the game.

To clear the system cache

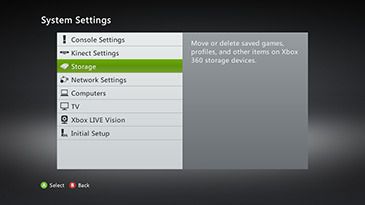
1.  Press the Guide button on your controller, go to Settings, and select System Settings.
2.  Select Storage.


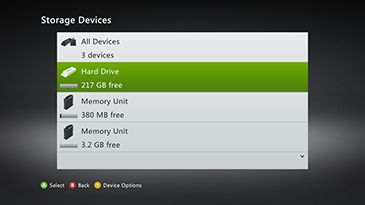
3.  Highlight (but don’t select) a storage device, and then press Y on your controller for Device Options.
Note It doesn't matter which storage device you choose. The cache will be cleared for all storage devices.


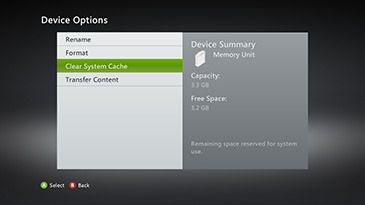
4.  On the Device Options screen, select Clear System Cache.


5. When prompted to confirm storage device maintenance, select Yes. 
Note When the system cache has been successfully cleared, you’re returned to the Storage Devices screen. You can then press the Guide button on the controller and return to Xbox Home.

HOW TO: Splitscreen Xbox 360 Minecraft

Splitscreen is a Console Edition-exclusive feature that allows up to four players to play on one screen at the same time. Using Splitscreen requires a screen with an output of at least 720p or higher. On television screens this can be achieved using either an HDMI or RGB component cable. Local Splitscreen can be played using Local, Silver and Gold accounts, while Online Splitscreen can only be played using Gold and Guest accounts. Guest accounts can only be signed in at the start of a session; they can not join existing sessions.

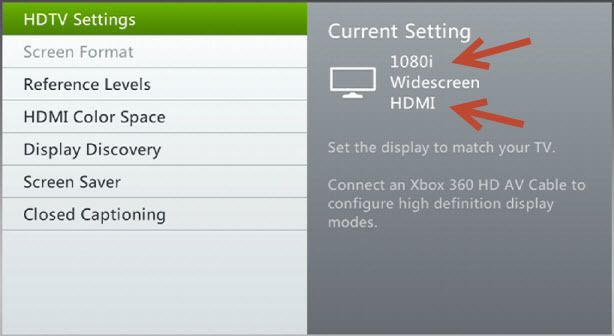
Because Splitscreen requires a screen with an output of 720p or higher, the console's video output needs to be configured accordingly. The video mode can be checked by going to Settings > System > Console Settings > Display - Make sure this is set to 720p or higher.


The following guide will show step by step how to setup and play a Local Splitscreen game


Step 1. Select play game and choose to either Create a New world or Load a previous world and make sure you are using 720p video.


Step 2. Make sure to uncheck the Online Game box.

Step 3. After entering the world, press start on the controller you wish to bring into the game.


Step 4. Sign in the player who will be using the controller.

Local splitscreen can be played with up to 4 players.

Online Splitscreen

The following guide will show step by step how to setup and play an Online Splitscreen game

Friday, March 13, 2015

How To: Factory Reset or reset your Xbox One to factory defaults

There are certain situations that you my have to wipe your Xbox One clean otherwise known as a "Factory Reset" or as Xbox Support likes to say "reset your console to factory defaults."

This procedure is not to be taken lightly.  You will lose everything. This includes settings, installed or downloaded games and DLC.  Eventhough you game saves should generally be safe because they are stored in the "Cloud," if the console did not finish uploading the latest saves before you do a "Factory Reset" you could lose your most recent saves.

Your Xbox Live Profile (GamerTag) will be about the only thing not to worry about losing since it is always in the cloud.

Why do would you want to do this?  Well if you decide to sell or trade in your console it wipes all personal information from your One.  Also the may an issue with the console the none of the other tricks or troubleshooting will help.  THIS IS A LAST RESORT.

Here is how to complete this dirty task:

Note: If you can't perform the following procedure to restore the factory default settings because you have no picture on your screen or you can’t access the Settings menu, you can alternatively perform this action by using a file loaded to a USB flash drive. For access to the file and the instructions, see Offline System Update Diagnostic Tool.


If you are ready to reset your console to the factory default settings, follow these steps:


1. Go to the Home screen.

2. Press the Menu button on the Xbox One Wireless Controller. 

3. Select Settings. Select Restore factory defaults. 


Read the warning message and select Yes.


Your Xbox One console will now begin the process of erasing all content and resetting itself to the default settings.

Help: Find Out Why You Were Banned or Suspended

Oh no.  Did you just try to use your Xbox One or Xbox 360 and receive a notice that you were suspended or worse even banned?

I'm pretty sure you know what you did to get a punishment and Chances of having your suspension shortened or your ban lifted is very very slim and I can't help with that, but I'll tell you how you can find out more information about your ban or suspension.

First off check out the Xbox Policy & Enforcement Site here you will find all the rules you must abide by in order to not be suspended or banned. You can easily find out what infraction you may have done. You can also input your consoles serial number and see if the console was banned.  If a console is banned you will never be able to use that console on live again.  This is also good if you are going to buy a used console and want to check and make sure it is not banned before purchase.

When you are banned or suspend you will receive an e-mail to the account your gamertag is registered under.  If you think you never received your e-mail check you SPAM folder it might be there.

If you can't find the e-mail or don't have access to your account anymore the best thing to do is post in the forums on http://xbox.com for more info, do not call support they will be little or no help.

Use these links to reach the correct forum

Xbox 360 Account Suspensions & Console Bans

Xbox One Account & Console Enforcement Actions